I
wanna show you how to make a tile pattern from CorelDRAW using the Ellipse Tool
and repeating the pattern in Photoshop.
This is the preview image.
Draw Your Shapes
Step 1
Open
the new file document on your CorelDRAW and lets begin to create the tile
pattern. In the Tool bar, pick the Ellipse
Tool (F7). Set the value of objects position and objects size like shown
image below. I create the object size is 50 pixel x 100 pixel.
Go
to Window-Color Palletes-Default RGB Pallete.
In the Color Pallete, you choose
dark brown color to fill the object and right-click on white square to delete
the outline.
Step 2
Then
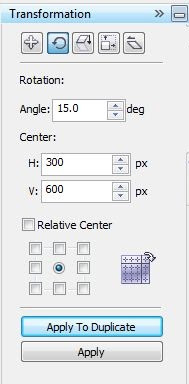
go to Window-Docker-Transformations-Rotate
(Alt+F8). Select the object and set the value of angle is 15°. See the
image below. Hit apply to duplicate button at 11 times.
Take the Pick Tool drag marquee select all objects. On the Property bar, click Combine (Ctrl+L) button.
This
is the result.
Step 3
Go
to File-Export (Ctrl+E), save as png
file. I named as ‘Tile’.
Apply Repeating Pattern in Photoshop
Worksheet
Step 1
Open
your tile patern (Ctrl+O).
Go to Edit-Define Pattern. Name your pattern, as shown.
Step 2
In
the new Photoshop worksheet, create a new file (Ctrl+N) with size is 600 x 600px.
Step 3
Now its time to apply your patten. Create
a New Layer icon in the Layers Panel and go to Edit-Fill. In the Fill dialog box, choose one of the following options for Use is
Pattern and from the Custom Pattern dropdown,
please click the ‘Tile.png’ pattern. I used the Normal mode and Opacity
to 100 %. Click OK button.
Your
pattern should be like this.
Now I
change the Blend Mode to Multiply and Opacity to 40%.
We
have got the next result with the background color is
Conclusion
I
hope that you learned something from this tutorial and created another
techniques with CorelDRAW tools then
apply repeating your pattern in Photoshop.


No comments:
Post a Comment